구글 파이어베이스(Firebase) 완벽 가이드: 개발자를 위한 필수 서비스
구글 파이어베이스(Firebase) 완벽 가이드
앱 개발의 모든 단계를 지원하는 구글의 통합 플랫폼 완벽 해부
📚 목차
파이어베이스(Firebase)란?
파이어베이스(Firebase)는 구글이 제공하는 모바일 및 웹 애플리케이션 개발 플랫폼으로, 앱 개발 여정 전반에서 개발자를 지원하도록 설계되었습니다. 백엔드 인프라를 구축하고 관리하는 복잡한 작업 없이도 고품질 앱을 빠르게 개발할 수 있게 해주는 도구들의 집합입니다.
파이어베이스는 BaaS(Backend as a Service)라는 개념을 통해 서버 측 개발의 복잡성을 크게 줄이고, 개발자가 사용자 경험과 비즈니스 로직에 집중할 수 있도록 합니다. 최근에는 AI 기반 환경 구축을 위한 도구들도 추가되며 그 활용 범위가 더욱 넓어지고 있습니다.
빌드(Build)
확장 가능한 앱을 빠르고 안전하게 개발
실행(Run)
앱 성능을 모니터링하고 사용자 경험 최적화
성장(Grow)
사용자 참여와 수익화 전략 지원
왜 파이어베이스를 사용해야 할까?
장점
- 신속한 개발: 백엔드 인프라 구축 시간 절약
- 통합 환경: 다양한 도구가 하나의 플랫폼에 통합
- 실시간 동기화: 데이터 변경사항 즉시 반영
- 확장성: 사용자 증가에 따른 인프라 자동 확장
- 크로스 플랫폼: iOS, Android, 웹 등 모든 플랫폼 지원
- Google의 인프라: 안정적이고 강력한 클라우드 기반
- 분석 도구: 사용자 행동 분석을 통한 인사이트 제공
단점
- 복잡한 쿼리 제한: 복잡한 DB 쿼리에 제약사항 존재
- 비용 관리: 트래픽 증가에 따른 비용 증가 가능성
- 커스터마이징 제한: 세부적인 커스터마이징 어려움
- 벤더 종속성: 구글 생태계에 의존하는 구조
- 데이터 마이그레이션: 다른 시스템으로의 이전 복잡
파이어베이스는
특히 스타트업, 소규모 팀, MVP(최소 기능 제품) 개발에 이상적인 선택입니다. 복잡한 백엔드 개발 없이도 완전한 기능을 갖춘 앱을 빠르게 출시할 수 있기 때문입니다. 대기업이나 복잡한 요구사항을 가진 프로젝트에서도 일부 기능을 활용하거나 마이크로서비스 아키텍처의 일부로 도입하는 경우가 많습니다.

파이어베이스 시작하기
파이어베이스를 사용하기 위한 기본 설정 과정을 단계별로 살펴보겠습니다. 웹, iOS, Android 등 모든 플랫폼에서 공통적으로 필요한 초기 설정 과정입니다.
Firebase 콘솔에서 프로젝트 만들기
먼저 Firebase 콘솔에 접속하여 구글 계정으로 로그인합니다. '프로젝트 추가' 버튼을 클릭하고 프로젝트 이름을 입력한 후 안내에 따라 프로젝트를 생성합니다.

Firebase 콘솔 대시보드 화면
앱 등록하기
프로젝트를 만든 후, 개발하려는 플랫폼(웹, iOS, Android)에 맞는 앱을 등록해야 합니다. 프로젝트 개요 페이지에서 플랫폼 아이콘을 클릭하고 안내에 따라 진행합니다.
// Firebase 구성 객체
const firebaseConfig = {
  apiKey: "YOUR_API_KEY",
  authDomain: "your-project-id.firebaseapp.com",
  projectId: "your-project-id",
  storageBucket: "your-project-id.appspot.com",
  messagingSenderId: "YOUR_MESSAGING_SENDER_ID",
  appId: "YOUR_APP_ID",
  measurementId: "YOUR_MEASUREMENT_ID"
};

// Firebase 초기화
firebase.initializeApp(firebaseConfig);
Firebase SDK 추가하기
앱에 Firebase 기능을 사용하기 위해 해당 SDK를 추가해야 합니다. 플랫폼별로 다른 방식으로 진행됩니다.
웹
HTML에 스크립트 추가 또는 npm/yarn을 통한 설치
npm install firebaseiOS
CocoaPods 또는 Swift Package Manager로 설치
pod 'Firebase/Core'Android
Gradle 빌드 파일에 의존성 추가
implementation 'com.google.firebase:firebase-bom:30.0.0'프로젝트 초기화 및 확인
SDK 설치 후, 앱에서 Firebase를 초기화하고 테스트합니다. 웹의 경우 다음과 같이 초기화할 수 있습니다:
// Firebase 앱 초기화
import { initializeApp } from 'firebase/app';

const app = initializeApp(firebaseConfig);
console.log('Firebase 초기화 성공!');
이제 기본적인 Firebase 설정이 완료되었습니다. 이어서 필요한 서비스별 설정 방법을 살펴보겠습니다.
인증(Authentication) 사용법
Firebase Authentication은 사용자 인증 시스템을 구축할 때 필요한 백엔드 서비스와 SDK, 그리고 UI 라이브러리를 제공합니다. 이메일/비밀번호, 전화번호, Google, Facebook, Twitter 등 다양한 로그인 방식을 지원합니다.
Firebase Authentication 콘솔 화면
주요 기능
- 다양한 로그인 방식: 이메일/비밀번호, 전화번호, 소셜 로그인(Google, Facebook, Twitter 등)
- 멀티 플랫폼 지원: 웹, iOS, Android 등 모든 플랫폼에서 동일한 인증 시스템 사용
- 보안 강화: 비밀번호 해싱, 계정 잠금, 이메일 인증 등의 보안 기능 제공
- 커스텀 인증: 자체 인증 시스템과의 통합 지원
이메일/비밀번호 인증 구현하기
먼저 Firebase 콘솔에서 Authentication > Sign-in method에서 이메일/비밀번호 로그인을 활성화합니다.
1. 회원가입 구현
import { getAuth, createUserWithEmailAndPassword } from "firebase/auth";

const auth = getAuth();
const email = "user@example.com";
const password = "password123";

createUserWithEmailAndPassword(auth, email, password)
  .then((userCredential) => {
    // 가입 성공
    const user = userCredential.user;
    console.log("가입 성공:", user);
  })
  .catch((error) => {
    // 가입 실패
    const errorCode = error.code;
    const errorMessage = error.message;
    console.error("가입 실패:", errorCode, errorMessage);
  });
2. 로그인 구현
import { getAuth, signInWithEmailAndPassword } from "firebase/auth";

const auth = getAuth();
const email = "user@example.com";
const password = "password123";

signInWithEmailAndPassword(auth, email, password)
  .then((userCredential) => {
    // 로그인 성공
    const user = userCredential.user;
    console.log("로그인 성공:", user);
  })
  .catch((error) => {
    // 로그인 실패
    const errorCode = error.code;
    const errorMessage = error.message;
    console.error("로그인 실패:", errorCode, errorMessage);
  });
3. 로그아웃 구현
import { getAuth, signOut } from "firebase/auth";

const auth = getAuth();
signOut(auth).then(() => {
  // 로그아웃 성공
  console.log("로그아웃 성공");
}).catch((error) => {
  // 로그아웃 실패
  console.error("로그아웃 실패:", error);
});
4. 현재 사용자 확인
import { getAuth, onAuthStateChanged } from "firebase/auth";

const auth = getAuth();
onAuthStateChanged(auth, (user) => {
  if (user) {
    // 사용자 로그인 상태
    console.log("현재 로그인된 사용자:", user);
  } else {
    // 사용자 로그아웃 상태
    console.log("로그인된 사용자 없음");
  }
});
소셜 로그인 구현하기
소셜 로그인을 구현하기 위해 먼저 Firebase 콘솔에서 해당 로그인 방식을 활성화해야 합니다. 여기서는 Google 로그인을 예로 들겠습니다.
import { getAuth, GoogleAuthProvider, signInWithPopup } from "firebase/auth";

const auth = getAuth();
const provider = new GoogleAuthProvider();

// 추가 OAuth 스코프 설정 (선택사항)
provider.addScope('https://www.googleapis.com/auth/contacts.readonly');

// 팝업 창으로 로그인
signInWithPopup(auth, provider)
  .then((result) => {
    // 로그인 성공
    const credential = GoogleAuthProvider.credentialFromResult(result);
    const token = credential.accessToken;
    const user = result.user;
    console.log("구글 로그인 성공:", user);
  })
  .catch((error) => {
    // 로그인 실패
    const errorCode = error.code;
    const errorMessage = error.message;
    const email = error.customData.email;
    const credential = GoogleAuthProvider.credentialFromError(error);
    console.error("구글 로그인 실패:", errorCode, errorMessage);
  });
리다이렉트 방식으로 로그인하려면 signInWithRedirect를 사용할 수 있습니다:
import { getAuth, GoogleAuthProvider, signInWithRedirect, getRedirectResult } from "firebase/auth";

const auth = getAuth();
const provider = new GoogleAuthProvider();

// 리다이렉트로 로그인
signInWithRedirect(auth, provider);

// 리다이렉트 결과 처리
getRedirectResult(auth)
  .then((result) => {
    if (result) {
      const user = result.user;
      console.log("리다이렉트 로그인 성공:", user);
    }
  })
  .catch((error) => {
    console.error("리다이렉트 로그인 실패:", error);
  });
인증 상태 관리하기
사용자의 인증 상태를 실시간으로 관찰하고 UI를 업데이트하는 것은 매우 중요합니다. onAuthStateChanged 리스너를 사용하여 이를 구현할 수 있습니다:
import { getAuth, onAuthStateChanged } from "firebase/auth";

const auth = getAuth();
const unsubscribe = onAuthStateChanged(auth, (user) => {
  if (user) {
    // 사용자가 로그인한 상태
    document.getElementById('loginStatus').textContent = `환영합니다, ${user.displayName || user.email}!`;
    document.getElementById('loginButtons').style.display = 'none';
    document.getElementById('logoutButton').style.display = 'block';
  } else {
    // 사용자가 로그아웃한 상태
    document.getElementById('loginStatus').textContent = '로그인이 필요합니다';
    document.getElementById('loginButtons').style.display = 'block';
    document.getElementById('logoutButton').style.display = 'none';
  }
});

// 컴포넌트가 언마운트될 때 리스너 해제
// React 예시: useEffect의 cleanup 함수에서 호출
// return () => unsubscribe();
데이터베이스(Firestore & Realtime DB) 활용
Firebase는 두 가지 데이터베이스 서비스를 제공합니다: Cloud Firestore와 Realtime Database. 두 서비스 모두 실시간 데이터 동기화를 지원하지만, 데이터 모델, 쿼리 기능, 확장성 등에서 차이가 있습니다.
Cloud Firestore
특징: 문서-컬렉션 기반의 NoSQL 데이터베이스로, 복잡한 데이터 구조와 강력한 쿼리 기능을 제공합니다.
장점:
- 더 강력한 쿼리 기능
- 자동 멀티 리전 데이터 복제
- 계층적 데이터 구조
- 더 큰 확장성
사용 사례: 복잡한 데이터 구조를 가진 앱, 대규모 애플리케이션
Realtime Database
특징: JSON 트리 형태로 데이터를 저장하는 원본 Firebase 데이터베이스입니다.
장점:
- 더 낮은 지연 시간
- 더 단순한 데이터 모델
- 더 적은 네트워크 사용량
- 단일 JSON 트리 구조
사용 사례: 실시간성이 중요한 앱(채팅, 게임 등), 단순한 데이터 구조
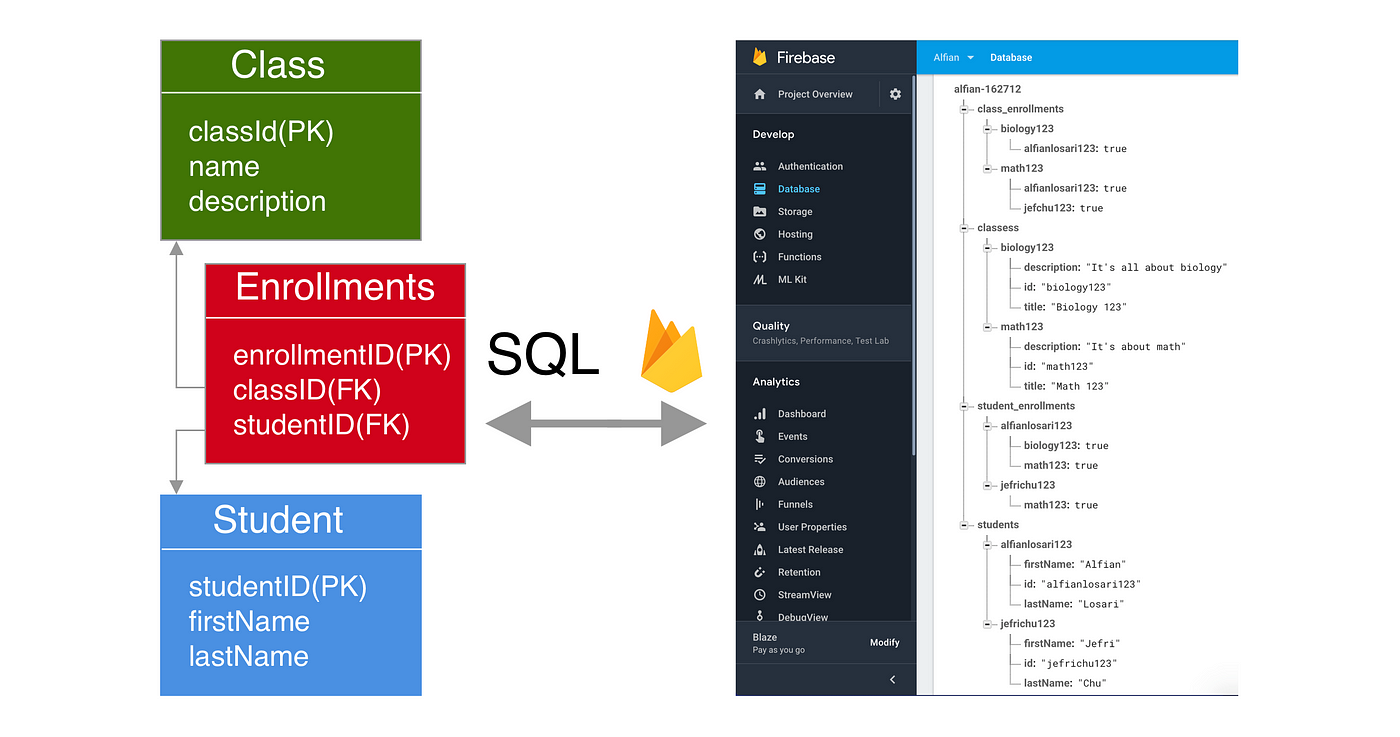
Firebase Realtime Database의 데이터 구조 예시
Cloud Firestore 사용하기
Cloud Firestore는 컬렉션과 문서로 구성된 계층적 데이터 모델을 사용합니다. 문서는 필드-값 쌍의 집합이며, 컬렉션은 문서들의 컨테이너입니다.
Firestore 데이터베이스 생성
Firebase 콘솔에서 Firestore Database를 선택하고 '데이터베이스 만들기' 버튼을 클릭합니다. 테스트 모드 또는 프로덕션 모드를 선택하고 지역을 설정합니다.
데이터 추가하기
문서를 생성하고 데이터를 추가하는 방법입니다:
import { getFirestore, collection, addDoc } from "firebase/firestore";

const db = getFirestore();

// 새 문서 추가 (자동 ID 생성)
try {
  const docRef = await addDoc(collection(db, "users"), {
    firstName: "홍",
    lastName: "길동",
    born: 1995,
    email: "gildong@example.com"
  });

  console.log("문서가 추가되었습니다. ID: ", docRef.id);
} catch (e) {
  console.error("문서 추가 오류: ", e);
}

// 특정 ID로 문서 추가
import { doc, setDoc } from "firebase/firestore";

try {
  await setDoc(doc(db, "users", "gildong123"), {
    firstName: "홍",
    lastName: "길동",
    born: 1995,
    email: "gildong@example.com"
  });

  console.log("문서가 추가되었습니다: gildong123");
} catch (e) {
  console.error("문서 추가 오류: ", e);
}
데이터 읽기
Firestore에서 데이터를 읽는 여러 방법을 알아보겠습니다:
import { getFirestore, doc, getDoc, collection, getDocs, query, where } from "firebase/firestore";

const db = getFirestore();

// 단일 문서 읽기
async function getUser(userId) {
  const docRef = doc(db, "users", userId);
  const docSnap = await getDoc(docRef);

  if (docSnap.exists()) {
    console.log("문서 데이터:", docSnap.data());
    return docSnap.data();
  } else {
    console.log("해당 문서가 없습니다!");
    return null;
  }
}

// 컬렉션의 모든 문서 읽기
async function getAllUsers() {
  const querySnapshot = await getDocs(collection(db, "users"));
  const users = [];

  querySnapshot.forEach((doc) => {
    users.push({
      id: doc.id,
      ...doc.data()
    });
  });

  return users;
}

// 쿼리로 특정 문서 필터링
async function getAdultUsers() {
  const usersRef = collection(db, "users");
  const q = query(usersRef, where("born", "<", 2000));
  const querySnapshot = await getDocs(q);

  const adultUsers = [];
  querySnapshot.forEach((doc) => {
    adultUsers.push({
      id: doc.id,
      ...doc.data()
    });
  });

  return adultUsers;
}
데이터 업데이트
기존 문서를 업데이트하는 방법입니다:
import { getFirestore, doc, updateDoc } from "firebase/firestore";

const db = getFirestore();

// 문서 필드 업데이트
async function updateUserEmail(userId, newEmail) {
  const userRef = doc(db, "users", userId);

  try {
    await updateDoc(userRef, {
      email: newEmail
    });
    console.log("문서가 성공적으로 업데이트되었습니다");
    return true;
  } catch (e) {
    console.error("문서 업데이트 오류: ", e);
    return false;
  }
}

// 필드 값 증가시키기
async function incrementUserAge(userId) {
  const userRef = doc(db, "users", userId);

  try {
    await updateDoc(userRef, {
      age: increment(1)
    });
    console.log("나이가 증가되었습니다");
    return true;
  } catch (e) {
    console.error("업데이트 오류: ", e);
    return false;
  }
}
데이터 삭제
문서나 필드를 삭제하는 방법입니다:
import { getFirestore, doc, deleteDoc, updateDoc, deleteField } from "firebase/firestore";

const db = getFirestore();

// 문서 전체 삭제
async function deleteUser(userId) {
  try {
    await deleteDoc(doc(db, "users", userId));
    console.log("문서가 성공적으로 삭제되었습니다");
    return true;
  } catch (e) {
    console.error("문서 삭제 오류: ", e);
    return false;
  }
}

// 특정 필드만 삭제
async function deleteUserEmail(userId) {
  const userRef = doc(db, "users", userId);

  try {
    await updateDoc(userRef, {
      email: deleteField()
    });
    console.log("이메일 필드가 삭제되었습니다");
    return true;
  } catch (e) {
    console.error("필드 삭제 오류: ", e);
    return false;
  }
}
실시간 데이터 리스너
데이터 변경사항을 실시간으로 감지하는 리스너를 설정하는 방법입니다:
import { getFirestore, doc, onSnapshot, collection } from "firebase/firestore";

const db = getFirestore();

// 단일 문서 변경 감지
const unsubscribeDoc = onSnapshot(doc(db, "users", "gildong123"), (doc) => {
  console.log("현재 데이터: ", doc.data());
  updateUI(doc.data());  // UI 업데이트 함수
});

// 컬렉션 변경 감지
const unsubscribeCollection = onSnapshot(collection(db, "users"), (snapshot) => {
  const users = [];
  snapshot.forEach((doc) => {
    users.push({
      id: doc.id,
      ...doc.data()
    });
  });

  console.log("사용자 목록 업데이트:", users);
  updateUsersList(users);  // UI 업데이트 함수
});

// 리스너 해제 (컴포넌트 언마운트 또는 사용 완료 시)
// unsubscribeDoc();
// unsubscribeCollection();
Realtime Database 사용하기
Realtime Database는 단일 JSON 트리 형태로 데이터를 저장합니다. 간단한 데이터 모델이지만 실시간 동기화에 최적화되어 있습니다.

Firebase Realtime Database의 JSON 트리 구조
import { getDatabase, ref, set, get, child, update, remove, onValue } from "firebase/database";

const db = getDatabase();

// 데이터 쓰기
function writeUserData(userId, name, email) {
  set(ref(db, 'users/' + userId), {
    username: name,
    email: email
  });
}

// 데이터 읽기
function readUserData(userId) {
  const dbRef = ref(db);
  get(child(dbRef, `users/${userId}`)).then((snapshot) => {
    if (snapshot.exists()) {
      console.log(snapshot.val());
      return snapshot.val();
    } else {
      console.log("데이터가 없습니다");
      return null;
    }
  }).catch((error) => {
    console.error(error);
    return null;
  });
}

// 데이터 업데이트
function updateUserEmail(userId, newEmail) {
  const updates = {};
  updates['users/' + userId + '/email'] = newEmail;

  return update(ref(db), updates);
}

// 데이터 삭제
function deleteUser(userId) {
  return remove(ref(db, 'users/' + userId));
}

// 실시간 리스너
function listenToUserChanges(userId) {
  const userRef = ref(db, 'users/' + userId);
  onValue(userRef, (snapshot) => {
    const data = snapshot.val();
    console.log("사용자 데이터 변경:", data);
    updateUI(data);  // UI 업데이트 함수
  });
}
Firestore vs Realtime Database: 어떤 것을 선택해야 할까?
Firestore를 선택하는 경우:
- 복잡한 쿼리가 필요한 경우
- 계층적 데이터 구조가 필요한 경우
- 대규모 확장성이 필요한 경우
- 보안 규칙이 복잡한 경우
Realtime Database를 선택하는 경우:
- 단순한 데이터 구조를 가진 경우
- 실시간 응답성이 매우 중요한 경우
- 네트워크 사용량을 최소화해야 하는 경우
- 단순한 JSON 트리 구조만으로 충분한 경우
호스팅(Hosting) 설정
Firebase Hosting은 웹 앱, 정적 콘텐츠, 마이크로서비스를 빠르고 안전하게 호스팅할 수 있는 서비스입니다. 전 세계 CDN을 통해 콘텐츠를 제공하며 HTTPS를 기본으로 지원합니다.
주요 기능
- SSL 기본 제공: 모든 호스팅 사이트에 SSL 인증서 자동 적용
- 글로벌 CDN: 전 세계 콘텐츠 전송 네트워크로 빠른 로딩 속도 제공
- 롤백 기능: 이전 버전으로 즉시 되돌릴 수 있는 버전 관리
- 미리보기 채널: 프로덕션 환경에 배포하기 전 변경사항 테스트
- 커스텀 도메인: 사용자 정의 도메인 연결 지원
- Cloud Functions 연동: 동적 콘텐츠 제공 가능
Firebase CLI 설치
먼저 Node.js와 npm이 설치되어 있어야 합니다. 터미널에서 다음 명령어로 Firebase CLI를 설치합니다:
npm install -g firebase-toolsFirebase 로그인 및 프로젝트 초기화
터미널에서 Firebase에 로그인하고 프로젝트를 초기화합니다:
# Firebase 로그인
firebase login

# 프로젝트 디렉토리로 이동
cd 프로젝트_폴더

# Firebase 프로젝트 초기화
firebase init
firebase init 명령어를 실행하면 다음과 같은 절차가 진행됩니다:
- 사용할 Firebase 서비스 선택 (여기서는 Hosting을 선택)
- 프로젝트 선택 (기존 프로젝트 선택 또는 새 프로젝트 생성)
- 공개 디렉토리 설정 (일반적으로 "public" 또는 빌드 결과물 디렉토리)
- SPA(단일 페이지 애플리케이션) 설정 여부
- GitHub Action 설정 여부
파일 배포하기
웹 사이트 파일을 준비한 후 Firebase Hosting에 배포합니다:
# 배포하기
firebase deploy

# Hosting만 배포하기
firebase deploy --only hosting

# 특정 사이트만 배포하기 (여러 사이트가 있는 경우)
firebase deploy --only hosting:사이트_이름
커스텀 도메인 설정
Firebase 콘솔의 Hosting 섹션에서 '커스텀 도메인 연결' 버튼을 클릭하여 자신의 도메인을 Firebase 호스팅 사이트에 연결할 수 있습니다. 단계에 따라 도메인 소유권을 확인하고 DNS 레코드를 설정합니다.
미리보기 채널 사용
프로덕션 환경에 배포하기 전에 변경사항을 테스트하기 위해 미리보기 채널을 사용할 수 있습니다:
# 미리보기 채널에 배포하기
firebase hosting:channel:deploy 채널_이름

# 예시
firebase hosting:channel:deploy beta-test
미리보기 채널은 특정 시간(기본 7일) 후에 자동으로 만료됩니다. 만료 시간을 변경하려면 다음과 같이 설정할 수 있습니다:
# 30일 동안 미리보기 채널 유지
firebase hosting:channel:deploy 채널_이름 --expires 30d
firebase.json 설정 파일 활용
firebase.json 파일에서 다양한 호스팅 설정을 구성할 수 있습니다:
{
  "hosting": {
    "public": "dist",
    "ignore": [
      "firebase.json",
      "**/.*",
      "**/node_modules/**"
    ],
    "rewrites": [
      {
        "source": "**",
        "destination": "/index.html"
      }
    ],
    "headers": [
      {
        "source": "**/*.@(js|html)",
        "headers": [
          {
            "key": "Cache-Control",
            "value": "max-age=3600"
          }
        ]
      }
    ],
    "redirects": [
      {
        "source": "/old-page",
        "destination": "/new-page",
        "type": 301
      }
    ]
  }
}
위 설정은 다음과 같은 내용을 포함합니다:
- 공개 디렉토리를 "dist"로 설정
- 특정 파일 및 디렉토리 무시
- 모든 요청을 index.html로 리다이렉트(SPA 지원)
- 특정 파일 타입에 대한 캐시 헤더 설정
- URL 리다이렉션 설정
스토리지(Storage) 활용
Firebase Storage는 이미지, 오디오, 비디오 등의 사용자 생성 콘텐츠를 저장하고 제공하기 위한 서비스입니다. Google Cloud Storage의 강력한 기능과 보안을 기반으로 구축되었습니다.
주요 기능
- 강력한 보안: Firebase 인증 및 보안 규칙으로 접근 제어
- 확장성: 대용량 파일 및 대규모 사용자 지원
- 멀티 플랫폼: 웹, iOS, Android 등 다양한 플랫폼 지원
- 업로드/다운로드 관리: 일시 중지, 재개, 진행률 모니터링 등
- 메타데이터 지원: 파일에 대한 추가 정보 저장
Storage 초기화
Firebase 프로젝트에서 Storage를 사용하기 위한 초기화 방법입니다:
import { initializeApp } from "firebase/app";
import { getStorage, ref } from "firebase/storage";

// Firebase 앱 초기화
const firebaseConfig = {
  // 설정 정보
};

const app = initializeApp(firebaseConfig);

// Storage 초기화
const storage = getStorage(app);
파일 업로드
사용자 파일을 Firebase Storage에 업로드하는 방법입니다:
import { getStorage, ref, uploadBytes, uploadBytesResumable, getDownloadURL } from "firebase/storage";

const storage = getStorage();

// 기본 업로드
async function uploadFile(file) {
  // 파일 경로 및 이름 설정
  const storageRef = ref(storage, 'images/' + file.name);

  try {
    // 파일 업로드
    const snapshot = await uploadBytes(storageRef, file);
    console.log('파일이 업로드되었습니다!');

    // 다운로드 URL 가져오기
    const downloadURL = await getDownloadURL(snapshot.ref);
    console.log('파일 다운로드 URL:', downloadURL);

    return downloadURL;
  } catch (error) {
    console.error('업로드 오류:', error);
    return null;
  }
}

// 진행률 모니터링이 가능한 업로드
function uploadFileWithProgress(file, progressCallback) {
  return new Promise((resolve, reject) => {
    const storageRef = ref(storage, 'images/' + file.name);
    const uploadTask = uploadBytesResumable(storageRef, file);

    uploadTask.on('state_changed',
      (snapshot) => {
        // 진행률 계산
        const progress = (snapshot.bytesTransferred / snapshot.totalBytes) * 100;
        console.log('업로드 진행률: ' + progress + '%');
        progressCallback(progress);
      },
      (error) => {
        // 오류 처리
        console.error('업로드 오류:', error);
        reject(error);
      },
      async () => {
        // 완료 시 다운로드 URL 가져오기
        try {
          const downloadURL = await getDownloadURL(uploadTask.snapshot.ref);
          console.log('파일 다운로드 URL:', downloadURL);
          resolve(downloadURL);
        } catch (error) {
          reject(error);
        }
      }
    );
  });
}

// 사용 예시 (파일 입력 필드에서)
document.getElementById('fileInput').addEventListener('change', async (e) => {
  const file = e.target.files[0];
  if (file) {
    const progressBar = document.getElementById('progressBar');

    try {
      const url = await uploadFileWithProgress(file, (progress) => {
        progressBar.value = progress;
      });

      console.log('업로드 완료! URL:', url);
      document.getElementById('uploadedImage').src = url;
    } catch (error) {
      console.error('업로드 실패:', error);
    }
  }
});
파일 다운로드 및 표시
Storage에 저장된 파일의 다운로드 URL을 가져와 사용하는 방법입니다:
import { getStorage, ref, getDownloadURL } from "firebase/storage";

const storage = getStorage();

// 파일 다운로드 URL 가져오기
async function getImageUrl(imagePath) {
  try {
    const imageRef = ref(storage, imagePath);
    const url = await getDownloadURL(imageRef);
    return url;
  } catch (error) {
    console.error('다운로드 URL 가져오기 오류:', error);

    // 오류 유형에 따른 처리
    switch (error.code) {
      case 'storage/object-not-found':
        console.log('파일이 존재하지 않습니다');
        break;
      case 'storage/unauthorized':
        console.log('권한이 없습니다');
        break;
      case 'storage/canceled':
        console.log('사용자가 업로드를 취소했습니다');
        break;
      case 'storage/unknown':
        console.log('알 수 없는 오류가 발생했습니다');
        break;
    }

    return null;
  }
}

// 사용 예시
async function displayProfileImage(userId) {
  const imagePath = `profileImages/${userId}.jpg`;
  const imageUrl = await getImageUrl(imagePath);

  if (imageUrl) {
    document.getElementById('profileImage').src = imageUrl;
  } else {
    // 기본 이미지 표시
    document.getElementById('profileImage').src = '/assets/default-profile.jpg';
  }
}
파일 삭제
더 이상 필요하지 않은 파일을 삭제하는 방법입니다:
import { getStorage, ref, deleteObject } from "firebase/storage";

const storage = getStorage();

// 파일 삭제하기
async function deleteFile(filePath) {
  const fileRef = ref(storage, filePath);

  try {
    await deleteObject(fileRef);
    console.log('파일이 성공적으로 삭제되었습니다');
    return true;
  } catch (error) {
    console.error('파일 삭제 오류:', error);
    return false;
  }
}

// 사용 예시
document.getElementById('deleteButton').addEventListener('click', async () => {
  const imagePath = 'images/profile.jpg';
  const deleted = await deleteFile(imagePath);

  if (deleted) {
    alert('이미지가 삭제되었습니다');
    document.getElementById('imageContainer').innerHTML = '';
  } else {
    alert('이미지 삭제에 실패했습니다');
  }
});
메타데이터 관리
파일의 메타데이터를 설정하고 가져오는 방법입니다:
import { getStorage, ref, uploadBytes, getMetadata, updateMetadata } from "firebase/storage";

const storage = getStorage();

// 메타데이터와 함께 파일 업로드
async function uploadWithMetadata(file, metadata) {
  const storageRef = ref(storage, 'images/' + file.name);

  try {
    // 메타데이터 설정
    const customMetadata = {
      contentType: file.type,
      customMetadata: metadata
    };

    const snapshot = await uploadBytes(storageRef, file, customMetadata);
    console.log('파일이 메타데이터와 함께 업로드되었습니다');
    return true;
  } catch (error) {
    console.error('업로드 오류:', error);
    return false;
  }
}

// 메타데이터 가져오기
async function getFileMetadata(filePath) {
  const fileRef = ref(storage, filePath);

  try {
    const metadata = await getMetadata(fileRef);
    console.log('메타데이터:', metadata);
    return metadata;
  } catch (error) {
    console.error('메타데이터 가져오기 오류:', error);
    return null;
  }
}

// 메타데이터 업데이트
async function updateFileMetadata(filePath, newMetadata) {
  const fileRef = ref(storage, filePath);

  try {
    const updatedMetadata = await updateMetadata(fileRef, newMetadata);
    console.log('메타데이터가 업데이트되었습니다:', updatedMetadata);
    return updatedMetadata;
  } catch (error) {
    console.error('메타데이터 업데이트 오류:', error);
    return null;
  }
}

// 사용 예시
const fileInput = document.getElementById('fileInput');
fileInput.addEventListener('change', async (e) => {
  const file = e.target.files[0];
  if (file) {
    const metadata = {
      uploadedBy: 'user123',
      category: 'profile',
      description: '프로필 이미지'
    };

    await uploadWithMetadata(file, metadata);
  }
});
파일 관리 모범 사례
- 보안 규칙 설정: 적절한 보안 규칙으로 파일 접근 제어하기
- 폴더 구조 정리: 논리적인 폴더 구조로 파일 관리하기 (예: `/users/{userId}/profile.jpg`)
- 파일 크기 제한: 큰 파일은 압축하거나 분할 업로드 고려하기
- 데이터베이스 연동: 파일 참조 정보를 Firestore에 저장하여 관리하기
- 불필요한 파일 정리: 사용하지 않는 파일은 주기적으로 삭제하기
클라우드 함수(Cloud Functions) 활용
Firebase Cloud Functions는 서버리스 함수를 실행할 수 있는 환경을 제공하여, 백엔드 코드를 Firebase 이벤트에 응답하여 자동으로 실행할 수 있게 해줍니다. 서버를 관리할 필요 없이 확장 가능한 백엔드 기능을 구현할 수 있습니다.

Firebase Cloud Functions의 작동 개념
주요 기능
- 이벤트 기반 실행: Firebase 서비스의 이벤트에 응답하여 함수 실행
- HTTP 요청 처리: REST API 엔드포인트 생성
- 예약된 함수: 특정 시간에 함수 실행 (크론 작업)
- 자동 확장: 트래픽에 따라 자동으로 확장
- 다양한 언어 지원: JavaScript, TypeScript, Python 등
Cloud Functions 설정
Cloud Functions를 사용하기 위한 초기 설정 방법입니다:
# Firebase CLI 설치 (아직 설치하지 않은 경우)
npm install -g firebase-tools

# Firebase 로그인
firebase login

# 프로젝트 디렉토리로 이동
cd 프로젝트_폴더

# Firebase 프로젝트 초기화 (Functions 선택)
firebase init functions
firebase init functions 명령어를 실행하면 다음과 같은 절차가 진행됩니다:
- 사용할 언어 선택 (JavaScript 또는 TypeScript)
- ESLint 사용 여부
- npm 종속성 설치 여부
초기화가 완료되면 functions 디렉토리가 생성되고 기본 파일이 설정됩니다.
HTTP 함수 작성
HTTP 요청에 응답하는 Cloud Function을 작성하는 방법입니다:
// functions/index.js

const functions = require("firebase-functions");
const admin = require("firebase-admin");
admin.initializeApp();

// HTTP 함수 (GET 요청 처리)
exports.helloWorld = functions.https.onRequest((request, response) => {
  functions.logger.info("Hello logs!", {structuredData: true});
  response.send("Hello from Firebase!");
});

// HTTP 함수 (POST 요청 처리)
exports.addUser = functions.https.onRequest(async (request, response) => {
  // POST 요청만 허용
  if (request.method !== "POST") {
    response.status(405).send("Method Not Allowed");
    return;
  }

  try {
    // 요청 본문에서 데이터 추출
    const { name, email } = request.body;

    if (!name || !email) {
      response.status(400).send("이름과 이메일은 필수 항목입니다");
      return;
    }

    // Firestore에 사용자 추가
    const result = await admin.firestore().collection("users").add({
      name,
      email,
      createdAt: admin.firestore.FieldValue.serverTimestamp(),
    });

    response.status(201).json({
      message: "사용자가 성공적으로 추가되었습니다",
      userId: result.id,
    });
  } catch (error) {
    functions.logger.error("사용자 추가 중 오류 발생:", error);
    response.status(500).send("서버 오류가 발생했습니다");
  }
});
Firebase 이벤트에 응답하는 함수
Firestore, Authentication, Storage 등의 이벤트에 반응하는 함수를 작성하는 방법입니다:
// functions/index.js

const functions = require("firebase-functions");
const admin = require("firebase-admin");
admin.initializeApp();

// Firestore 문서 생성 시 실행되는 함수
exports.createUserProfile = functions.auth.user().onCreate(async (user) => {
  // 사용자가 생성되면 기본 프로필 문서 생성
  try {
    await admin.firestore().collection("profiles").doc(user.uid).set({
      displayName: user.displayName || "",
      email: user.email,
      photoURL: user.photoURL || "",
      createdAt: admin.firestore.FieldValue.serverTimestamp(),
      isNewUser: true,
    });

    functions.logger.info(`사용자 ${user.uid}의 프로필이 생성되었습니다`);
    return null;
  } catch (error) {
    functions.logger.error("프로필 생성 중 오류 발생:", error);
    return null;
  }
});

// Firestore 문서 업데이트 시 실행되는 함수
exports.updateUserStats = functions.firestore
  .document("posts/{postId}")
  .onCreate(async (snapshot, context) => {
    const postData = snapshot.data();
    const authorId = postData.authorId;

    // 사용자의 게시물 통계 업데이트
    try {
      const userRef = admin.firestore().collection("users").doc(authorId);

      // 트랜잭션으로 안전하게 업데이트
      await admin.firestore().runTransaction(async (transaction) => {
        const userDoc = await transaction.get(userRef);

        if (!userDoc.exists) {
          throw new Error("사용자가 존재하지 않습니다");
        }

        const userData = userDoc.data();
        const postCount = (userData.postCount || 0) + 1;

        transaction.update(userRef, { postCount });
      });

      functions.logger.info(`사용자 ${authorId}의 게시물 통계가 업데이트되었습니다`);
      return null;
    } catch (error) {
      functions.logger.error("통계 업데이트 중 오류 발생:", error);
      return null;
    }
  });

// Storage 파일 업로드 시 실행되는 함수
exports.generateThumbnail = functions.storage
  .object()
  .onFinalize(async (object) => {
    // 이미지 파일만 처리
    if (!object.contentType.startsWith("image/")) {
      functions.logger.info("이미지 파일이 아니므로 건너뜁니다");
      return null;
    }

    // 이미 썸네일인 경우 건너뛰기
    if (object.name.includes("thumb_")) {
      functions.logger.info("이미 썸네일이므로 건너뜁니다");
      return null;
    }

    functions.logger.info(`${object.name} 파일의 썸네일 생성을 시작합니다`);

    // 여기서 썸네일을 생성하는 로직 구현
    // (외부 라이브러리를 사용하여 이미지 처리)

    functions.logger.info("썸네일이 생성되었습니다");
    return null;
  });
예약된 함수(Scheduled Functions)
특정 시간에 주기적으로 실행되는 함수를 작성하는 방법입니다:
// functions/index.js

const functions = require("firebase-functions");
const admin = require("firebase-admin");
admin.initializeApp();

// 매일 자정에 실행되는 함수
exports.dailyCleanup = functions.pubsub
  .schedule("0 0 * * *")
  .timeZone("Asia/Seoul") // 서울 시간대
  .onRun(async (context) => {
    const now = admin.firestore.Timestamp.now();

    // 30일 이상 지난 임시 데이터 삭제
    const thirtyDaysAgo = new Date(now.toMillis() - 30 * 24 * 60 * 60 * 1000);

    try {
      // 만료된 임시 파일 찾기
      const snapshot = await admin.firestore()
        .collection("temp_files")
        .where("createdAt", "<", thirtyDaysAgo)
        .get();

      // 일괄 삭제
      const batch = admin.firestore().batch();
      snapshot.forEach((doc) => {
        batch.delete(doc.ref);
      });

      await batch.commit();

      functions.logger.info(`${snapshot.size}개의 만료된 임시 파일이 삭제되었습니다`);
      return null;
    } catch (error) {
      functions.logger.error("일일 정리 중 오류 발생:", error);
      return null;
    }
  });

// 매주 월요일 오전 9시에 실행되는 함수
exports.weeklyReport = functions.pubsub
  .schedule("0 9 * * 1")
  .timeZone("Asia/Seoul")
  .onRun(async (context) => {
    // 주간 보고서 생성 로직
    functions.logger.info("주간 보고서 생성을 시작합니다");

    // ... 보고서 생성 로직 ...

    functions.logger.info("주간 보고서가 생성되었습니다");
    return null;
  });
함수 배포
작성한 Cloud Functions를 Firebase에 배포하는 방법입니다:
# 모든 함수 배포
firebase deploy --only functions

# 특정 함수만 배포
firebase deploy --only functions:함수이름1,functions:함수이름2

# 예시
firebase deploy --only functions:helloWorld,functions:addUser
고급 기능
환경 변수 및 비밀 값 설정
Firebase 프로젝트의 함수 구성에서 환경 변수와 비밀 값을 설정할 수 있습니다:
# 환경 변수 설정
firebase functions:config:set servicex.key="API_KEY" servicex.url="https://api.example.com"

# 환경 변수 목록 확인
firebase functions:config:get

# 함수에서 환경 변수 사용
const functions = require("firebase-functions");
const apiKey = functions.config().servicex.key;
const apiUrl = functions.config().servicex.url;
타사 API 통합
Cloud Functions에서 외부 API를 호출하는 예시입니다:
const functions = require("firebase-functions");
const admin = require("firebase-admin");
const axios = require("axios"); // axios 라이브러리 설치 필요

admin.initializeApp();

exports.translateText = functions.https.onCall(async (data, context) => {
  // 사용자 인증 확인
  if (!context.auth) {
    throw new functions.https.HttpsError(
      "unauthenticated",
      "인증된 사용자만 이 기능을 사용할 수 있습니다"
    );
  }

  const { text, targetLanguage } = data;

  if (!text || !targetLanguage) {
    throw new functions.https.HttpsError(
      "invalid-argument",
      "텍스트와 대상 언어를 제공해야 합니다"
    );
  }

  try {
    // 번역 API 호출
    const apiKey = functions.config().translate.key;
    const response = await axios.post(
      "https://translation.googleapis.com/language/translate/v2",
      {},
      {
        params: {
          q: text,
          target: targetLanguage,
          key: apiKey,
        },
      }
    );

    const translation = response.data.data.translations[0].translatedText;

    return { translation };
  } catch (error) {
    functions.logger.error("번역 중 오류 발생:", error);
    throw new functions.https.HttpsError("internal", "번역 처리 중 오류가 발생했습니다");
  }
});
Cloud Functions 사용 시 주의사항
- 콜드 스타트: 함수가 일정 시간 사용되지 않으면 비활성화되고, 다시 호출 시 초기화 시간이 필요함
- 실행 시간 제한: 기본적으로 함수 실행 시간은 최대 540초(9분)로 제한됨
- 메모리 제한: 함수 실행에 사용할 수 있는 메모리가 제한됨
- 비용 관리: 무료 할당량을 초과하면 요금이 발생할 수 있음
- 오류 처리: 적절한 오류 처리와 로깅이 중요함
실제 사용 사례
Firebase를 활용한 다양한 실제 사용 사례를 살펴보겠습니다. 이러한 사례를 통해 Firebase가 어떻게 실제 프로젝트에서 활용될 수 있는지 이해할 수 있습니다.
소셜 네트워킹 앱
사용자 간 실시간 소통과 콘텐츠 공유 플랫폼
사용 기능
- Authentication: 사용자 인증 및 프로필 관리
- Firestore: 사용자 게시물, 댓글, 친구 관계 저장
- Storage: 이미지 및 미디어 파일 저장
- Cloud Functions: 알림 전송, 콘텐츠 검토
- Analytics: 사용자 행동 분석
구현 요점
- 실시간 업데이트를 위한 리스너 설정
- 사용자 간 관계 데이터 모델링
- 프라이버시 설정에 따른 접근 제어
- 푸시 알림 구현
실시간 채팅 앱
개인 및 그룹 메시징 서비스
사용 기능
- Authentication: 사용자 인증
- Realtime Database: 메시지 저장 및 실시간 동기화
- Cloud Functions: 푸시 알림, 메시지 번역
- Storage: 미디어 메시지 저장
구현 요점
- 효율적인 메시지 데이터 구조 설계
- 읽음 상태 및 타이핑 표시 구현
- 오프라인 지원 및 메시지 캐싱
- 대화 목록의 최신 메시지 표시
이커머스 앱
제품 판매 및 결제 플랫폼
사용 기능
- Authentication: 사용자 계정 관리
- Firestore: 제품 카탈로그, 주문 정보 저장
- Storage: 제품 이미지 저장
- Cloud Functions: 결제 처리, 재고 관리, 주문 알림
- Analytics: 구매 행동 분석
구현 요점
- 제품 검색 및 필터링 기능
- 장바구니 및 결제 프로세스
- 재고 관리 및 품절 처리
- 주문 상태 추적 및 알림
콘텐츠 스트리밍 앱
오디오/비디오 콘텐츠 제공 서비스
사용 기능
- Authentication: 사용자 인증 및 구독 관리
- Firestore: 콘텐츠 메타데이터, 사용자 기록 저장
- Storage: 미디어 파일 저장
- Cloud Functions: 콘텐츠 인코딩, 추천 시스템
- Hosting: 웹 애플리케이션 호스팅
구현 요점
- 미디어 스트리밍 최적화
- 시청/청취 기록 및 재생 위치 저장
- 개인화된 콘텐츠 추천
- 구독 및 결제 관리
사례 연구: 실시간 협업 도구
여러 사용자가 동시에 작업할 수 있는 실시간 협업 도구를 Firebase로 구현하는 방법을 살펴보겠습니다. 이 예시는 메모, 할 일 목록, 프로젝트 관리 등 다양한 협업 도구에 적용할 수 있습니다.
데이터 모델 설계
Firestore 데이터 구조를 다음과 같이 설계합니다:
// 데이터 구조 예시

// 프로젝트 컬렉션
projects/
  {projectId}/
    name: "마케팅 캠페인"
    description: "2024년 여름 마케팅 캠페인 계획"
    createdAt: timestamp
    ownerId: "user123"

    // 프로젝트 멤버 하위 컬렉션
    members/
      {userId}/
        email: "user@example.com"
        role: "editor"
        joinedAt: timestamp

    // 문서 하위 컬렉션
    documents/
      {documentId}/
        title: "브레인스토밍 노트"
        content: {...} // 문서 내용
        createdAt: timestamp
        updatedAt: timestamp
        createdBy: "user123"

        // 문서 변경 이력 하위 컬렉션
        history/
          {historyId}/
            timestamp: timestamp
            userId: "user456"
            changes: {...} // 변경 내용
실시간 공동 편집 구현
여러 사용자가 동시에 문서를 편집할 수 있도록 실시간 동기화를 구현합니다:
import { getFirestore, doc, onSnapshot, updateDoc } from "firebase/firestore";

const db = getFirestore();

// 문서 데이터 실시간 감지
function setupDocumentListener(projectId, documentId, onChange) {
  const docRef = doc(db, `projects/${projectId}/documents/${documentId}`);

  return onSnapshot(docRef, (docSnap) => {
    if (docSnap.exists()) {
      onChange(docSnap.data());
    }
  });
}

// 문서 콘텐츠 업데이트
async function updateDocumentContent(projectId, documentId, content, userId) {
  const docRef = doc(db, `projects/${projectId}/documents/${documentId}`);

  try {
    await updateDoc(docRef, {
      content: content,
      updatedAt: new Date(),
      lastEditedBy: userId,
    });

    // 변경 이력 추가 (별도 함수로 구현)
    await addDocumentHistory(projectId, documentId, userId, content);

    return true;
  } catch (error) {
    console.error("문서 업데이트 오류:", error);
    return false;
  }
}
권한 관리
사용자 역할에 따른 권한 관리를 구현합니다:
// Firestore 보안 규칙 예시
service cloud.firestore {
  match /databases/{database}/documents {
    // 프로젝트 관련 규칙
    match /projects/{projectId} {
      // 프로젝트는 소유자와 멤버만 읽을 수 있음
      allow read: if isSignedIn() && (isProjectOwner(projectId) || isProjectMember(projectId));

      // 프로젝트는 소유자만 업데이트/삭제할 수 있음
      allow update, delete: if isSignedIn() && isProjectOwner(projectId);

      // 멤버 하위 컬렉션 규칙
      match /members/{userId} {
        allow read: if isSignedIn() && (isProjectOwner(projectId) || isProjectMember(projectId));
        allow write: if isSignedIn() && isProjectOwner(projectId);
      }

      // 문서 하위 컬렉션 규칙
      match /documents/{documentId} {
        // 문서는 프로젝트 멤버만 읽을 수 있음
        allow read: if isSignedIn() && (isProjectOwner(projectId) || isProjectMember(projectId));

        // 문서는 편집 권한이 있는 멤버만 수정할 수 있음
        allow create, update: if isSignedIn() && (isProjectOwner(projectId) || hasEditPermission(projectId));

        // 문서는 소유자만 삭제할 수 있음
        allow delete: if isSignedIn() && isProjectOwner(projectId);

        // 이력 하위 컬렉션은 읽기만 가능
        match /history/{historyId} {
          allow read: if isSignedIn() && (isProjectOwner(projectId) || isProjectMember(projectId));
          allow create: if isSignedIn() && (isProjectOwner(projectId) || hasEditPermission(projectId));
          allow update, delete: if false; // 이력은 수정/삭제 불가
        }
      }
    }

    // 헬퍼 함수
    function isSignedIn() {
      return request.auth != null;
    }

    function isProjectOwner(projectId) {
      return isSignedIn() && get(/databases/$(database)/documents/projects/$(projectId)).data.ownerId == request.auth.uid;
    }

    function isProjectMember(projectId) {
      return isSignedIn() && exists(/databases/$(database)/documents/projects/$(projectId)/members/$(request.auth.uid));
    }

    function hasEditPermission(projectId) {
      return isSignedIn() &&
        (get(/databases/$(database)/documents/projects/$(projectId)/members/$(request.auth.uid)).data.role == "editor" ||
         get(/databases/$(database)/documents/projects/$(projectId)/members/$(request.auth.uid)).data.role == "admin");
    }
  }
}
활동 로그 및 알림
Cloud Functions를 사용하여 문서 변경 시 알림을 보내는 기능을 구현합니다:
// functions/index.js

const functions = require("firebase-functions");
const admin = require("firebase-admin");
admin.initializeApp();

// 문서 변경 시 알림 전송
exports.notifyDocumentChanges = functions.firestore
  .document("projects/{projectId}/documents/{documentId}")
  .onUpdate(async (change, context) => {
    const { projectId, documentId } = context.params;

    const beforeData = change.before.data();
    const afterData = change.after.data();

    // 내용이 변경된 경우에만 알림 전송
    if (beforeData.content === afterData.content) {
      return null;
    }

    try {
      // 프로젝트 정보 가져오기
      const projectSnapshot = await admin.firestore()
        .collection("projects")
        .doc(projectId)
        .get();

      if (!projectSnapshot.exists) {
        return null;
      }

      const projectData = projectSnapshot.data();

      // 프로젝트 멤버 목록 가져오기
      const membersSnapshot = await admin.firestore()
        .collection(`projects/${projectId}/members`)
        .get();

      const members = [];
      membersSnapshot.forEach(doc => {
        // 편집자는 제외 (자신의 변경사항에 대한 알림 방지)
        if (doc.id !== afterData.lastEditedBy) {
          members.push(doc.data());
        }
      });

      // 편집자 정보 가져오기
      const editorSnapshot = await admin.firestore()
        .collection("users")
        .doc(afterData.lastEditedBy)
        .get();

      const editorName = editorSnapshot.exists ?
        editorSnapshot.data().displayName : "알 수 없는 사용자";

      // 각 멤버에게 알림 생성
      const batch = admin.firestore().batch();

      members.forEach(member => {
        if (member.email) {
          const notificationRef = admin.firestore()
            .collection(`users/${member.uid}/notifications`)
            .doc();

          batch.set(notificationRef, {
            type: "document_update",
            title: `${projectData.name} 프로젝트 업데이트`,
            message: `${editorName}님이 "${afterData.title}" 문서를 업데이트했습니다.`,
            projectId,
            documentId,
            createdAt: admin.firestore.FieldValue.serverTimestamp(),
            read: false
          });
        }
      });

      await batch.commit();

      functions.logger.info(`${members.length}명의 사용자에게 문서 업데이트 알림을 전송했습니다.`);
      return null;
    } catch (error) {
      functions.logger.error("알림 전송 중 오류:", error);
      return null;
    }
  });
요금제 및 주의사항
Firebase는 무료 Spark 플랜과 유료 Blaze 플랜(종량제)을 제공합니다. 프로젝트 규모와 사용량에 따라 적절한 플랜을 선택해야 합니다. 각 서비스별 무료 할당량과 초과 시 부과되는 요금을 이해하는 것이 중요합니다.
Spark 플랜 (무료)
소규모 프로젝트 및 개인 개발자를 위한 무료 플랜
포함 사항
- Authentication: 최대 월간 10,000명의 사용자
- Firestore: 저장 1GB, 다운로드 10GB/월, 문서 쓰기/삭제/업데이트 각 20,000회/일
- Realtime Database: 저장 1GB, 다운로드 10GB/월
- Storage: 저장 5GB, 다운로드 30GB/월, 업로드 20,000회/일
- Hosting: 저장 10GB, 다운로드 360MB/일
- Cloud Functions: 제한적 지원
제한 사항
- 외부 네트워크 요청 불가 (Cloud Functions)
- 데이터 전송은 미국 및 유럽 지역만 가능
- 다중 지역 배포 불가
- 제한된 할당량으로 큰 프로젝트에 부적합
Blaze 플랜 (종량제)
프로덕션 애플리케이션을 위한 종량제 플랜
포함 사항
- Authentication: 무제한 사용자 (요금 없음)
- Firestore: Spark 플랜 할당량 + 초과분 종량제 요금
- Realtime Database: Spark 플랜 할당량 + 초과분 종량제 요금
- Storage: Spark 플랜 할당량 + 초과분 종량제 요금
- Hosting: Spark 플랜 할당량 + 초과분 종량제 요금
- Cloud Functions: 전체 기능 사용 가능, 무료 할당량 + 초과분 종량제 요금
추가 혜택
- 외부 네트워크 요청 가능
- 다중 지역 배포 지원
- 더 많은 동시 연결 지원
- Google Cloud Platform 서비스와 통합
- 무료 할당량 제공 후 초과분에 대해서만 요금 부과
주의사항 및 비용 관리 팁
- 요금 폭탄 방지: 예산 알림 설정하기
- 비용 추적: 정기적으로 사용량 모니터링하기
- 보안 규칙 최적화: 무분별한 읽기/쓰기 방지하기
- 인덱스 관리: 필요한 인덱스만 생성하기
- 데이터 구조 최적화: 효율적인 데이터 모델링으로 비용 절감하기
- 캐싱 활용: 반복적인 데이터 요청 최소화하기
- 배치 처리: 여러 작업을 일괄 처리하여 비용 절감하기
- Cloud Functions 최적화: 함수 실행 시간과 메모리 사용량 줄이기
비용 모니터링 설정
Firebase와 Google Cloud Platform에서 비용을 모니터링하는 방법입니다:
- Google Cloud Console에서 결제 섹션으로 이동
- "결제 알림"을 선택하고 "예산 알림 만들기" 클릭
- 예산 이름을 지정하고 기간(월별 등) 설정
- 예산 금액 설정 (예: 50달러)
- 알림 임계값 설정 (예: 50%, 80%, 100%)
- 알림을 받을 이메일 주소 지정
데이터베이스 쿼리 최적화
비용을 절감하기 위한 데이터베이스 쿼리 최적화 방법입니다:
// 비효율적인 쿼리 (모든 문서를 가져온 후 필터링)
const getAllPosts = async () => {
  const querySnapshot = await getDocs(collection(db, "posts"));
  const recentPosts = [];

  querySnapshot.forEach((doc) => {
    const post = doc.data();
    // 클라이언트에서 필터링 (비효율적)
    if (post.createdAt > oneWeekAgo) {
      recentPosts.push({
        id: doc.id,
        ...post
      });
    }
  });

  return recentPosts;
};

// 최적화된 쿼리 (서버에서 필터링)
const getRecentPosts = async () => {
  const oneWeekAgo = new Date();
  oneWeekAgo.setDate(oneWeekAgo.getDate() - 7);

  const postsRef = collection(db, "posts");
  const q = query(postsRef,
    where("createdAt", ">", oneWeekAgo),
    orderBy("createdAt", "desc"),
    limit(20)
  );

  const querySnapshot = await getDocs(q);
  const recentPosts = [];

  querySnapshot.forEach((doc) => {
    recentPosts.push({
      id: doc.id,
      ...doc.data()
    });
  });

  return recentPosts;
};
결론
Firebase는 개발자가 복잡한 백엔드 인프라 구축 없이도 고품질 앱을 빠르게 개발할 수 있게 해주는 강력한 플랫폼입니다. 인증, 데이터베이스, 스토리지, 호스팅, 클라우드 함수 등 다양한 서비스를 통합 환경에서 제공하여 개발 과정을 간소화합니다.
이 가이드에서는 Firebase의 핵심 기능들과 그 사용법을 자세히 살펴보았습니다. 각 서비스의 기본 설정부터 고급 활용법까지 다루어, 여러분이 프로젝트에 적용할 수 있는 실질적인 지식을 제공하고자 했습니다.
Firebase는 소규모 프로젝트부터 대규모 엔터프라이즈 애플리케이션까지 다양한 규모의 프로젝트에 사용할 수 있습니다. 무료 Spark 플랜으로 시작하여 애플리케이션이 성장함에 따라 종량제 Blaze 플랜으로 전환할 수 있습니다.
개발 시간 단축, 실시간 데이터 동기화, 강력한 보안 기능, 확장성 등 Firebase가 제공하는 다양한 이점을 활용하여 여러분의 앱 개발 경험을 향상시키고, 사용자에게 더 나은 서비스를 제공하시기 바랍니다.
Firebase를 활용한 개발 여정에서 성공하시기를 응원합니다!
댓글